Hey cocktail lovers! Ever wondered how your favorite bartender crafts those incredible cocktails with such ease? It’s not just skill, my friends – it’s often about having the right tools.
After years behind the bar, and countless hours perfecting drinks at home, I’ve learned that quality equipment can truly transform your mixology game.
Forget flimsy shakers and sticky jiggers; investing in proper bartender-recommended gear is the ultimate secret to elevating your home bar and impressing everyone.
You deserve a setup that makes crafting amazing drinks a joy, not a chore. Let’s dive into the essential cocktail tools that will turn you into a home bar hero!
Shakers That Don’t Quit: The Heart of Your Cocktail Craft

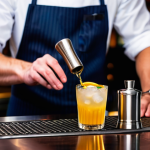
Okay, let’s be real. A cocktail shaker isn’t just a metal cup; it’s the engine of your drink-making adventure! I’ve been through my fair share of shakers – from the cheap, leaky ones that leave sticky puddles everywhere to the absolute workhorses that stand the test of time. Trust me, investing in a good shaker makes all the difference. You want something that seals tight, is comfortable to hold, and has enough capacity for a couple of drinks at once. After countless experiments, I’ve settled on a couple of favorites that I swear by. The Boston shaker, in particular, is my go-to. It’s a two-piece wonder, usually a metal tin and a mixing glass, that creates a super-tight seal when you give it a good whack. It might look a little intimidating at first, but once you get the hang of it, you’ll feel like a true pro. There’s just something so satisfying about the ‘thwack’ when you separate it after shaking up a perfect martini. Believe me, I’ve had many evenings where a good shaker made the difference between a triumphant cocktail hour and a sticky, frustrating mess. Plus, the heft of a quality shaker just feels right in your hand, giving you that confidence boost as you whip up masterpieces for your friends and family.
The Boston Shaker: My Personal Favorite
If you’re serious about your home bar, a Boston shaker is non-negotiable. I remember the first time I used one; it felt a little clunky compared to the cobbler shaker I was used to, but the control and efficiency it offered quickly won me over. The two-piece design, typically a large metal tin and a slightly smaller glass or metal counterpart, allows for quick chilling and easy straining. The key is to create a vacuum seal by gently tapping the tin after inserting the glass. This seal prevents leaks, which is a game-changer when you’re vigorously shaking. Cleaning is also a breeze, as there are fewer nooks and crannies for ingredients to get stuck in. I’ve found that a good 28oz (800ml) weighted tin paired with an 18oz (530ml) unweighted tin or a sturdy mixing glass is the ideal setup for most home bartenders. This combo gives you plenty of room to shake multiple drinks or incorporate larger ice cubes for maximum chilling without over-dilution. It’s truly a foundational piece that will elevate your technique.
Cobbler Shakers: Style Meets Simplicity
For those just starting out or who prefer an all-in-one solution, the cobbler shaker is a fantastic choice. It’s typically a three-piece unit with a main tin, a built-in strainer, and a cap. I’ve recommended these to so many friends who are just dipping their toes into mixology, and they always rave about the convenience. While I personally lean towards the Boston for its versatility, a good cobbler shaker can absolutely get the job done, especially for single servings or simpler recipes. The integrated strainer is a huge plus for beginners, eliminating the need for a separate hawthorne or julep strainer. Just be sure to check the quality; some cheaper models can have strainers that clog easily or caps that stick after chilling. My advice? Look for one with a robust cap and a strainer that has reasonably sized holes. It’s all about finding what feels right in your hands and fits your personal bartending style. I used a beautiful copper cobbler shaker for years, and it was a stunning piece on my bar cart, sparking many conversations!
Precision Pouring: Jiggers and Measuring Mastery
You know, people often underestimate the importance of accurate measurements in cocktail making. It’s not just about getting the right amount of booze in there (though that’s part of it!), it’s about balance. A perfectly balanced cocktail is a thing of beauty, a symphony of flavors hitting all the right notes. And for that, you need a reliable jigger. I’ve seen so many people eyeball their pours, and while that can work for a simple gin and tonic, anything more complex will suffer. Think of baking – you wouldn’t just guess at the flour quantity, would you? Cocktails are no different. A good jigger ensures consistency, meaning you can recreate that amazing drink you made last weekend, every single time. Over the years, I’ve tried everything from shot glasses to tiny measuring cups, but nothing beats a properly designed jigger. It’s truly a foundational tool for consistency and for understanding the building blocks of any drink. The tactile experience of pouring a precise measure just feels professional, and it helps you learn the ratios by heart over time.
Double-Sided Jiggers: The Versatile Workhorse
My absolute favorite type of jigger is the double-sided one, usually with a 1 oz (30ml) measure on one side and a 2 oz (60ml) on the other. Many also feature etched lines on the inside for half-ounce increments, which is incredibly handy. I can’t tell you how many times these specific markings have saved my drinks from being too sweet or too strong. I remember one time I was making a batch of Aviation cocktails, and a precise half-ounce of Crème de Violette is crucial – too much and it tastes like soap, too little and you lose that beautiful color and floral hint. My double-sided jigger was my trusty companion that evening! Look for jiggers made from stainless steel, as they’re durable, easy to clean, and won’t retain flavors. The polished finish also just looks fantastic on any bar setup. I’ve noticed that jiggers with a rolled lip tend to pour cleaner, reducing drips and spills, which is a small detail that makes a big difference in keeping your bar area tidy.
Jigger Alternatives: When You Need Something Different
While the double-sided jigger is king, sometimes you need something a little different. For larger batch cocktails or when I’m making multiple drinks, a small measuring cup with clearly marked increments (like a mini Pyrex measuring cup) can be incredibly useful. I’ve also found that a set of measuring spoons can come in handy for tiny dashes of bitters or obscure liqueurs where a jigger is overkill. However, be cautious with shot glasses; while they might seem convenient, their measurements are often inconsistent and rarely standardized. If you’re going for precision, stick to dedicated bar tools. I even keep a small digital scale on my bar for those incredibly precise recipes that call for measurements by weight, especially when I’m experimenting with new syrups or infusions. This might seem a bit over the top for a home bar, but if you’re into the science of cocktails like I am, it’s a fun addition to your toolkit.
Stirring Up Success: Essential Bar Spoons and Strainers
Alright, let’s talk about stirring. This isn’t just about swirling liquid around; it’s about achieving the perfect dilution and chill for spirit-forward cocktails like Manhattans and Negronis. You don’t want to over-dilute, making your drink watery, nor do you want it under-chilled, leaving it warm and insipid. That’s where a good bar spoon comes in. And a proper strainer? Absolutely crucial. There’s nothing worse than taking a sip of a beautifully crafted drink only to get a mouthful of ice shards or muddled herbs. I’ve definitely learned this the hard way – once, I served a mint julep that was more mint leaf than liquid because I used a flimsy strainer. Never again! The right tools ensure a clean, crisp drink every single time, showcasing your skill and attention to detail. I’ve found that the ritual of stirring a drink with a long, elegant bar spoon is almost meditative, and it definitely adds to the whole experience of crafting a cocktail. It’s these small touches that separate a decent drink from an absolutely spectacular one.
The Art of the Stir: Why Your Bar Spoon Matters
A good bar spoon is longer than your average kitchen spoon, often with a twisted handle for easier stirring and sometimes a weighted end for muddling. I particularly love spoons with a flat disc on the end; they’re surprisingly versatile for light muddling or even layering ingredients. The length allows you to reach the bottom of a tall mixing glass, ensuring even chilling and dilution. When stirring, the goal is to gently agitate the ice and liquid, not to aerate it like you would in a shaker. This is why you want a spoon that glides smoothly around the inside of your mixing glass. Stainless steel is, again, the material of choice for durability and hygiene. I always recommend getting a spoon that feels balanced in your hand; some are too light and flimsy, making the stirring action feel awkward. My current favorite has a beautiful spiral handle that makes spinning it a joy, and it’s robust enough to handle daily use without bending or looking worn. It’s an understated tool, but truly indispensable for a certain category of cocktails.
Straining for Perfection: Hawthorne and Julep Strainers
Now, let’s talk strainers. For shaken drinks, the Hawthorne strainer is your best friend. It has a coiled spring that fits snugly into the mouth of your shaker, holding back ice, fruit pulp, and herbs. Look for one with a tight coil and a comfortable finger rest. Some even have adjustable “ears” that fit different sized tins – a nice bonus! I’ve found that a good quality Hawthorne strainer with a double-mesh can even act as a fine strainer in a pinch, though I typically use a separate fine-mesh sieve for that purpose to catch the tiniest bits. For stirred drinks, the Julep strainer is the classic choice. It’s a perforated spoon-like tool that fits perfectly over the top of a mixing glass, allowing the liquid to flow freely while holding back ice. I love its elegant simplicity and how it perfectly complements the stirring process. Both types of strainers are essential for creating professional-looking and tasting cocktails. I usually have both within arm’s reach when I’m mixing, as each serves a distinct and important purpose in my cocktail-making ritual.
The Art of the Muddle: Releasing Flavor Bombs
When you’re dreaming of a mojito bursting with fresh mint or an Old Fashioned with a beautifully aromatic orange peel, you’re thinking about the magic of muddling. This isn’t about pulverizing ingredients into a paste; it’s about gently coaxing out their essential oils and juices, unlocking incredible flavors and aromas that simply can’t be achieved any other way. I’ve seen people use everything from the back of a spoon to a meat tenderizer for muddling, and while it might “work,” it’s rarely effective and often damages the delicate ingredients. A proper muddler allows you to extract those precious aromatics without bitterness or over-extraction. There’s a fine line between releasing flavor and bruising ingredients, and the right muddler helps you walk that line perfectly. It’s a surprisingly tactile process, and I love feeling the resistance of the ingredients as I gently press and twist, knowing that I’m unlocking a burst of freshness that will define the drink. It’s one of those tools that, once you have it, you can’t imagine crafting certain cocktails without it.
Choosing Your Perfect Muddler
Muddlers come in a few common forms: wooden, stainless steel, and plastic. My personal preference leans towards wooden muddlers for their traditional feel, especially those made from a sturdy hardwood like beech or maple. They tend to have a better grip and are less likely to bruise delicate herbs if used correctly. However, make sure to get an unvarnished one, as varnish can chip off into your drink – trust me, I learned that the hard way with a cheap gift set! For citrus, I often reach for a muddler with a grooved, plastic head. These are excellent for gently breaking down fruit to release juices without imparting any woody flavors, and they’re super easy to clean. The key is to avoid muddlers with sharp “teeth” as these can over-muddle and extract bitterness, especially from citrus rinds. Remember, you’re pressing and twisting, not smashing. A good muddler should feel comfortable in your hand and have enough weight to do the job without requiring excessive force. I’ve had my current wooden muddler for years, and it’s developed a beautiful patina from all the delicious cocktails it’s helped create.
Muddling Techniques for Maximum Flavor
The secret to great muddling lies in technique. For delicate herbs like mint, a gentle press and twist – just enough to release the oils – is all you need. Over-muddling mint will release chlorophyll, leading to a bitter, grassy taste that can ruin a Mojito. I usually give mint about 3-5 gentle presses, just enough to smell its freshness. For citrus wedges, you can be a bit more firm, pressing and twisting to extract the juice and some of the flavorful oils from the peel. For harder ingredients like ginger or sugar cubes, a more vigorous press might be necessary. Always muddle directly in your serving glass or shaker, depending on the recipe. The goal is to maximize flavor extraction while minimizing bitterness and undesirable textures. I’ve found that practicing with different ingredients helps you develop a feel for how much pressure is needed. It’s a skill that definitely improves with practice, and the payoff is incredibly flavorful, vibrant cocktails. Don’t be afraid to experiment, but always start gently!
Perfecting the Chill: Ice Molds and Beyond
Ice isn’t just frozen water; it’s a critical ingredient in any cocktail. And let me tell you, not all ice is created equal! The type of ice you use profoundly impacts the dilution, temperature, and even the presentation of your drink. For years, I just used whatever came out of my freezer’s ice maker, but once I started experimenting with different ice molds, my cocktail game elevated dramatically. Large, dense ice cubes melt slowly, providing sustained chilling with minimal dilution – perfect for spirit-forward drinks. Crushed ice, on the other hand, provides maximum chill and dilution quickly, ideal for refreshing, effervescent drinks like a Mint Julep or a Moscow Mule. Don’t underestimate the visual appeal either; a beautifully clear, large ice cube in a crystal-clear drink is a statement piece. I’ve noticed a huge difference in how long a drink stays perfectly chilled and balanced when I use high-quality ice, and it’s a small effort that yields significant rewards. It’s truly a secret weapon for home bartenders who want to impress.
| Ice Type | Best For | Melting Rate | Notes |
|---|---|---|---|
| Large Cubes/Spheres | Old Fashioneds, Whiskey Sours, Spirit-Forward Drinks | Slow | Minimal dilution, elegant presentation, great for sustained chill. My go-to for sipping spirits. |
| Standard Cubes | Most Shaken Cocktails, Highballs | Medium | Versatile, readily available. Good all-rounder for general use. |
| Crushed Ice | Mojitos, Juleps, Swizzles, Tropical Drinks | Fast | Rapid chilling, significant dilution, creates a lovely frosty effect. Requires a good amount of ice! |
| Collins Spear | Gin & Tonics, Tom Collins, Tall Drinks | Slow-Medium | Fits perfectly in tall glasses, prevents over-dilution. Looks sleek and modern. |
The Magic of Large Format Ice
If you’ve ever had a craft cocktail at a high-end bar, you’ve probably noticed those massive, crystal-clear ice cubes or spheres. These aren’t just for show! Their large surface area-to-volume ratio means they melt much, much slower than standard ice cubes. This is crucial for drinks where you want to maintain the integrity of the spirit and mixers without over-dilution. I swear by my large cube molds for anything from an Old Fashioned to a Negroni. It truly transforms the drinking experience, keeping your drink perfectly chilled from the first sip to the last, without becoming watery. I once made a batch of Boulevardiers for a small gathering using my large ice spheres, and everyone commented on how long their drinks stayed perfectly cold and flavorful. It’s a little extra step in prep, but the payoff in terms of drink quality and guest satisfaction is immense. I’ve experimented with various silicone molds, and while some are better than others, the effort is always worth it.
Crushed Ice: The Refreshing Powerhouse
 ...")
Sometimes, slow dilution isn’t the goal. For those long, refreshing drinks, especially on a hot summer day, crushed ice is king. Think Mojitos, Mint Juleps, or a glorious Gin Basil Smash. The rapid melting of crushed ice provides instant chill and a pleasing, slushy texture that is incredibly invigorating. You can achieve crushed ice a few ways: a good old-fashioned Lewis bag and mallet (my preferred method – it’s wonderfully therapeutic!), a heavy-duty blender (pulse, don’t blend!), or even some sophisticated ice makers that produce it automatically. I remember one sweltering August afternoon when I churned out an entire pitcher of Caipirinhas with crushed ice, and it was the highlight of the barbecue. The key is to use plenty of it – fill your glass almost to the brim before pouring in your drink. It’s messy, yes, but the results are undeniably delicious and supremely cooling. It’s a game-changer for certain cocktail categories that demand that frosty, almost snow-cone-like consistency.
Garnish Game Strong: Knives, Peelers, and Zesters
Let’s be honest: a cocktail isn’t just about what’s in the glass; it’s also about how it looks and smells. And that’s where garnishes come into play. A beautifully crafted garnish elevates a drink from simply good to truly spectacular. It adds visual appeal, but more importantly, it introduces aromatic elements that interact with the drink itself, enhancing the overall sensory experience. Think of a perfectly expressed orange peel over an Old Fashioned, releasing those vibrant citrus oils, or a delicate lemon twist adorning a Martini. You can’t achieve that level of finesse with a dull kitchen knife or a clumsy peeler. Over my years of bartending, I’ve learned that having dedicated tools for garnishing makes a world of difference. It transforms a mundane task into an artistic expression, allowing you to truly put your personal stamp on every drink you create. Don’t just plop a lime wedge in there; make it sing! It’s amazing how much a little effort in garnishing can transform a drink both visually and aromatically, taking it to a whole new level of deliciousness.
Mastering the Citrus Peel: Channel Knives and Zesters
For those elegant twists and spirals, a channel knife is an absolute must-have. It’s a small, specialized tool that creates thin, long strips of citrus peel, perfect for draping over the rim of a glass or twisting into a delicate knot. I remember the frustration of trying to get a perfect zest with a regular paring knife – usually ending up with thick, uneven pieces! A channel knife makes it effortless, allowing you to extract just the flavorful zest without the bitter pith. For finer garnishes or when I need a dusting of zest, a microplane zester is my go-to. It creates a fluffy, aromatic cloud of zest that beautifully enhances a drink’s aroma without adding too much texture. For example, a finely zested lime over a Gin Fizz is a revelation. I always keep my channel knife incredibly sharp, and clean it immediately after use to prevent any build-up of essential oils, ensuring it’s ready for the next creative garnish session. These small tools truly empower you to be more artistic with your drinks.
Paring Knives and Vegetable Peelers: Essential for Flair
Beyond specialized tools, a sharp, small paring knife is indispensable for cutting fruit wedges, wheels, and more intricate shapes. Precision is key here, so invest in a good quality knife and keep it meticulously sharpened. I love using my paring knife to create dehydrated citrus wheels or intricate flower-like garnishes out of strawberries. For broader strips of citrus peel – excellent for expressing oils over a drink and then dropping in – a good quality vegetable peeler is surprisingly effective. Look for one with a swivel head that glides smoothly over the fruit, giving you consistent, wide strips. This is particularly useful for making those iconic “coin” garnishes out of orange peel for an Old Fashioned. The beauty of these tools is their versatility; while they have a place in the kitchen, their role behind the bar is equally important. They allow you to transform simple fruits into stunning adornments, making every drink a visual feast as well as a flavorful one. It’s all about making your cocktails Instagram-worthy!
Glassware Galore: The Right Vessel for Every Tipple
You wouldn’t serve a gourmet meal on a paper plate, would you? The same goes for cocktails! The right glassware isn’t just about aesthetics (though that’s a huge part of it); it also plays a crucial role in the aroma, temperature, and overall enjoyment of your drink. The shape of a glass can concentrate aromatics, maintain chill, or allow a drink to breathe. I’ve seen countless home bartenders pour their beautifully crafted Old Fashioneds into a pint glass, and while it might taste the same, it completely detracts from the experience. A proper glass enhances the ritual of drinking, making each sip feel more special. Over the years, I’ve amassed a rather extensive collection of glassware, and I genuinely believe it makes a tangible difference in how much I enjoy a cocktail. Each glass is designed with a specific purpose in mind, and understanding these nuances truly elevates your home bar game. It’s not just about what’s inside, but how it’s presented and perceived, and glassware is the ultimate silent partner in that experience.
The Classic Rocks Glass and Coupe
The rocks glass, also known as an Old Fashioned glass or tumbler, is a cornerstone of any home bar. Its wide mouth and sturdy base are perfect for drinks served on the rocks, allowing plenty of room for those large ice cubes we talked about earlier. It’s my go-to for classics like an Old Fashioned, a Negroni, or a Whiskey Sour. The weight of a good rocks glass just feels substantial in your hand, adding to the enjoyment. For elegant, shaken, “up” drinks (served without ice), the coupe glass is simply unparalleled. With its broad, shallow bowl and delicate stem, it’s perfect for showcasing drinks like a Manhattan, a Daiquiri, or a Sidecar. The wide opening allows the aromatics to really hit your nose with each sip. I adore the vintage charm of a coupe; it just transports you back to a more glamorous era of cocktail making. I always make sure these are sparkling clean before serving, as any smudges truly stand out against the backdrop of a beautiful, clear drink.
Highball and Martini Glasses: Essential Shapes
For those long, refreshing drinks, the highball glass is your best friend. Its tall, slender shape is ideal for fizzy concoctions like a Gin & Tonic, a Tom Collins, or a Mojito, as it helps to maintain carbonation and keeps the drink colder for longer. I often reach for these glasses when I’m making drinks with a lot of mixer, as they prevent the drink from becoming too diluted too quickly. And then, of course, there’s the iconic Martini glass. While often confused with the coupe, a true Martini glass typically has a conical bowl, designed to showcase the clarity and simple elegance of a Martini or a Vesper. While some argue the coupe is more versatile, there’s no denying the classic sophistication of a properly served Martini in its namesake glass. I’ve found that having a few of each of these essential types of glassware ensures you’re always ready to serve any cocktail in its perfectly suited vessel, making every drink feel like a special occasion.
Beyond the Basics: Upgrade Your Home Bar with These Gems
You’ve got the essentials down, but if you’re like me, you’ll soon find yourself wanting to dive deeper into the rabbit hole of cocktail creation. There are so many fantastic tools out there that aren’t strictly necessary for a basic setup but can significantly enhance your experience and expand your repertoire. Think of these as the fun upgrades, the gadgets that take your home bar from good to utterly amazing. I’ve personally found immense joy in experimenting with these advanced tools, discovering new techniques and flavors along the way. It’s like adding specialized lenses to your camera – suddenly, you can capture different perspectives and create entirely new visual stories. These aren’t just fancy trinkets; they’re tools that unlock new possibilities, allowing you to create more complex, nuanced, and visually stunning drinks. If you’re truly passionate about mixology, these are the items you’ll eventually find yourself craving, and trust me, they’re worth every penny for the creative freedom they offer.
Smoking Guns and Bitters Bottles: Adding Depth
Want to add a theatrical element and incredible depth of flavor to your cocktails? A smoking gun is a fantastic investment. This handheld device infuses drinks with the aroma of wood smoke, herbs, or spices. I remember making smoked Old Fashioneds for a dinner party, and the gasps of delight from my guests as the cloche was lifted were priceless! It’s an instant showstopper and adds a sophisticated, smoky note that transforms familiar drinks. Another often-overlooked upgrade is a set of beautiful bitters bottles. While many bitters come in their own dashers, having elegant, uniform bottles for your various tinctures and infusions just looks incredibly professional on your bar cart. Plus, they allow for more precise dashing, which is crucial when you’re working with potent bitters. I love how a tiny dash from a beautiful bottle can completely alter the profile of a drink, taking it from ordinary to extraordinary with just a flick of the wrist. It’s about combining function with refined aesthetics.
Clear Ice Makers and Fine Strainers: The Finer Details
If you’ve truly become obsessed with the quality of your ice (and who can blame you?), a dedicated clear ice maker or mold system is a game-changer. These specialized units produce perfectly clear, dense ice by controlling the freezing process, eliminating air bubbles and impurities. The difference in appearance and melt rate compared to regular freezer ice is astounding. I use mine almost daily, and the compliments I get on my ice are almost as frequent as those on my cocktails! For ultra-smooth drinks, a fine-mesh strainer (often called a ‘tea strainer’ or ‘double strainer’) is essential. After straining your cocktail through a Hawthorne or Julep strainer, pass it through the fine-mesh strainer to catch any tiny ice shards, fruit pulp, or herb fragments. This ‘double straining’ technique results in a silky-smooth texture that professional bartenders swear by. It’s a small detail, but one that truly elevates the mouthfeel and clarity of your finished drink. These upgrades show a true dedication to the craft, and they’re incredibly satisfying to use.
Concluding Thoughts
Alright, my fellow cocktail enthusiasts, we’ve covered a lot of ground today! From the fundamental shakers that kickstart your creativity to the nuanced art of ice and garnishes, and even the subtle elegance of the right glassware, every piece of equipment plays a vital role.
My hope is that this deep dive has sparked your imagination and encouraged you to look at your home bar not just as a collection of tools, but as a playground for flavor and expression.
Remember, the journey of crafting cocktails is as much about the discovery and the joy of making something delicious as it is about the final sip. So, get out there, experiment, and don’t be afraid to try new things – that’s where the real magic happens!
Handy Tips for Your Home Bar
1. Start Simple, Grow Smart: You don’t need every tool right away. Begin with a good shaker, a reliable jigger, and a bar spoon. As your passion grows, gradually add specialized items like a muddler, different strainers, and varied glassware. It’s about building a functional and enjoyable bar that suits *your* style and budget.
2. Quality Over Quantity: Trust me on this one – investing in high-quality tools pays off in the long run. Durable stainless steel, well-balanced designs, and sharp blades not only last longer but make the process of crafting drinks much more enjoyable and effective. Cheap tools can lead to frustration and sticky messes!
3. Ice is an Ingredient: Never underestimate the power of good ice. Whether it’s large, slow-melting cubes for an Old Fashioned or rapidly chilling crushed ice for a Mojito, the type and quality of your ice dramatically impact the taste, temperature, and dilution of your cocktail. It’s a game-changer!
4. Practice Makes Perfect (and Fun!): Don’t be intimidated by complex recipes or techniques. The more you shake, stir, and muddle, the more intuitive it becomes. Embrace the learning process, taste as you go, and remember that every “failed” drink is just a step towards a perfect one. Plus, it’s a great excuse to enjoy some delicious experiments.
5. Cleanliness is Next to Godliness: This might sound obvious, but keeping your bar tools clean and well-maintained is crucial. Residue from old drinks can affect the taste of new ones, and proper cleaning ensures your tools last. A quick rinse and wipe-down after each use will save you a lot of effort later.
Key Takeaways for Aspiring Mixologists
Crafting exceptional cocktails at home is an incredibly rewarding endeavor, and it all starts with the right tools. From shakers to strainers, jiggers to glassware, each piece plays a unique role in bringing your liquid creations to life.
Prioritize quality, embrace the journey of learning, and never underestimate the impact of good ice and thoughtful garnishes. Ultimately, the best home bar is one that brings you joy and empowers you to share incredible drinks with friends and family.
Cheers to your next delicious adventure!
Frequently Asked Questions (FAQ) 📖
Q: Why should I bother upgrading my cocktail tools if my current ones “work”?
A: Oh, my friend, this is a question I’ve heard countless times, and believe me, I used to think the same way! “Why spend more when my old, bent jigger and leaky shaker get the job done?” Well, after years of trial and error (and a few too many watered-down drinks), I can tell you from the bottom of my heart – and my perfectly crafted Old Fashioned – that investing in quality tools is a game-changer.
It’s not just about looking fancy; it’s about control, consistency, and pure enjoyment. Think about it: have you ever had a shaker that just wouldn’t seal, leaving a sticky mess all over your kitchen (and your favorite shirt)?
Or a jigger where the measurements seemed… optimistic? That’s where the frustration creeps in, right? When you upgrade, you’re investing in tools that perform reliably.
A quality shaker gives you a tight seal, meaning no leaks and perfectly chilled drinks. A precise jigger ensures every pour is spot-on, so your cocktails taste consistently amazing, every single time.
For me, it’s about the experience. When I pick up a weighty, well-balanced bar spoon, or feel the satisfying thwack of a Boston shaker sealing perfectly, it just makes the whole process feel more professional, more like an art form.
You’re not just mixing drinks; you’re crafting an experience, both for yourself and for your guests. It honestly elevates your entire home bar game, boosting your confidence and making you feel like a true mixology hero.
And let’s be real, fewer spills mean less cleanup, which is a win in my book any day!
Q: What are the absolute bare minimum, must-have tools a beginner should start with to create decent cocktails at home?
A: Alright, if you’re just dipping your toes into the incredible world of home mixology, you definitely don’t need to break the bank on every single gadget out there.
I’ve been there, staring at a wall of shiny bar tools, wondering where to even begin. So, based on my countless hours behind the stick (both professional and at home), here’s my personal list of the absolute, no-fluff essentials that will get you shaking and stirring like a pro in no time:First up, a shaker.
You’ll want either a Boston shaker (two tins, often metal-on-metal or metal-on-glass) or a Cobbler shaker (the three-piece kind with a built-in strainer).
For beginners, a Cobbler can feel a bit more intuitive because of that strainer, but many pros (myself included!) swear by the Boston for its versatility and durability.
Just remember, if you go Boston, you’ll need a separate strainer. Next, a jigger. This little guy is your best friend for precision.
Cocktails are like baking; exact measurements really matter for balance. Don’t eyeball it – a good jigger with clear markings (often 1 oz and 2 oz on opposite sides) will save you from unbalanced drinks.
Then, a strainer. If you opted for a Boston shaker, a Hawthorne strainer is a must to keep ice shards and muddled ingredients out of your finished drink.
Trust me, no one wants a mint leaf in their teeth mid-sip! A bar spoon is next on the list. It’s not just any spoon; its long, twisted handle is perfect for gracefully stirring drinks that you don’t want to “bruise” with shaking (think Martinis or Manhattans), and for layering ingredients.
Finally, a muddler. This is for mashing fresh fruits, herbs, and spices at the bottom of your glass or shaker to release their glorious flavors and aromas, crucial for drinks like Mojitos or Old Fashioneds.
With these five in your arsenal – a good shaker, a reliable jigger, a trusty strainer, a long bar spoon, and a solid muddler – you’re honestly set to tackle a huge range of classic and modern cocktails.
You’ll be amazed at what you can create!
Q: I’ve seen cocktail tools ranging from super cheap to quite expensive. Is there actually a big difference in quality, or am I just paying for a brand name?
A: Oh, this is such a valid question, and one I wrestled with for years! When I was first starting out, I bought a couple of those all-in-one “bargain” sets, and let me tell you, it was a mixed bag.
So, is there a difference between a $10 shaker and a $50 one? Absolutely, and it often boils down to a few key things that truly impact your cocktail-making experience.
First, durability and longevity are huge. Those super cheap tools? They often feel flimsy, the metal can bend easily, and the finishes can wear off quickly, sometimes even rusting after a few washes.
A quality tool, often made from thicker, food-grade stainless steel, feels solid in your hand and is built to last through countless cocktail sessions.
I’ve had some affordable pieces completely fall apart on me, leading to early replacements, which actually costs more in the long run! Then there’s performance.
This is where you really feel the difference. A cheap Cobbler shaker might leak like a sieve or get hopelessly stuck once chilled, making it a nightmare to open.
A good quality Boston shaker, especially weighted tins, will form a perfect, easy-to-break seal, making your shaking smooth and spill-free. Same goes for jiggers – a well-made one is perfectly balanced and has precise, clear measurements, ensuring consistency without fiddling.
Cheaper versions can be off-balance or have less accurate markings. Finally, there’s the user experience and aesthetic appeal. When you’re passionate about what you do, having tools that feel good, look good, and work seamlessly just makes the whole process more enjoyable.
A beautiful, well-crafted mixing glass or a perfectly weighted bar spoon isn’t just a tool; it’s an extension of your craft. While you don’t always need the most expensive option, I’ve found that investing a bit more in core items like your shaker and jigger pays dividends in satisfaction and results.
It’s not just marketing hype; it’s often a significant difference in build quality and functional design.